|
Practical
Bush Gear:
The Grub Box |
| |
I've
had people compliment me on my canoe -- a woodstrip prospector.
I've had them say kind things about my wall tent. My travelling
wood -- stove has attracted positive remarks, as has my
campfire tent. I've even had people say nice things about my
five-year-old as he slept sprawled out on the packs as we paddled
along. But no one has ever had a nice thing to say about
my grub box unless they've travelled with it for a few
days. Then, in several cases, partners of mine have made grub
boxes of their own.
A Maybe I should call it a Wannigan.
In fact a grub box can be a central item of travelling
gear. Its looks are against it, I know, but it's tremendously
handy on the trail. You open the lid and prop it level on a
rock or stake or on two of the containers from inside, and there
you have a complete kitchen. All your food is laid out
in labelled, waterproof containers. Nothing is hidden,
or disguised in little plastic bags. Pots and pans, bowls,
cutlery, candles etc are right to hand. If you need a little
garlic as you stir the soup, presto, it's right there.
Also, the lid functions as a counter top, and its flat
surface is a supreme luxury in the bush. |
|
|
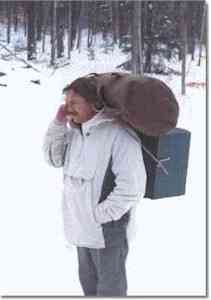
Dave,
demonstrating the comfortable way
to carry a grub box and tent. |
|
| |
|
|
THE
BIG MYTH of grub box use is that it must be hell on the portage
(after all it has no padded straps or frame and absolutely
nothing about it is made of gore-tex), but it's simply not
true. The flat top of the box goes against your back and
the ropes leading to the headband go around the side of the box
so that the pull is down, not backward. The head strap goes
over the center of the top of your head. YOU DON'T NEED
BULGING NECK MUSCLES. The wide leather band is soft on your
head, and in use, you automatically center the pull so that it's
balanced, and not pulling forward or back. The weight goes straight
down through the strongest structure of your body. On trips
I usually throw the tent or a pack on top to make a load.
|
A
few facts: I use a box made of light, 1/4" spruce plywood; not
the more common mahogany (which is heavier). I keep in it only about
3 days worth of supplies, refilling it from a grub pack. It is solid
enough to step on in the canoe, or on shore when lashing up poles.
It sits well on a toboggan for winter trips. There are compartments
for cutlery and spices and whatnot.
About the only thing you can't do with it is throw it
in your canoe from a distance. Since I made one, I haven't been on
a canoe or snowshoe trip without it.
|
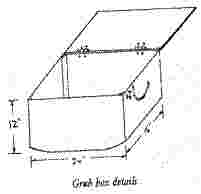
CONSTRUCTION
|
1 -- Before you can cut the plywood you must first make a template
of the curve of the hull of your canoe. (A grub box with square corners
will ding the hull and sit higher than it needs to.) Use cardboard
and cut it as required to mimic the hull shape. Transfer this curve
onto the front and back pieces of the box. (Try to arrange all the
curve in the 5" nearest the edges. Some part of the bottom must
be flat for the box to sit steadily.) Cut the plywood pieces, except
for the bottom piece at this point. (Make sure you take into account
the thickness of the plywood when calculating your finished dimensions.)
The bottom piece should be oversized, arranging its grain to make
the bend easiest. (Use a fine - toothed blade if using a power saw.)
2 -- Next cut the corner pieces. (You pretty much need
a table saw for this.) Start by ripping 2x4 stock down to 1 1/8"
x 1 1/8". Then set the blade to 45 degrees and rip the stock
into 2 pieces triangular in cross section. You need about 6' in total. |
MATERIALS
4' x 4' x 1/4" spruce plywood
1/4" x 3/4' cedar strips (26 linear feet)
1 1/8" x 1 1/8" spruce for corner pieces
1/2 litre fiberglass/epoxy resin
4' x 1' 6 oz. fiberglass cloth
Paint
Two 3" hinges
Eye bolt
Two 2 1/4" D rings (brass)
Canvas for cutlery divider
Clasp (or T hinge)
Snap hook (brass)
Elastic strap for spice rack
Box of 100 #5 x 5/8" wood screws
Carpenter's glue
3/4" brads
1/4" staples
2" x 16" leather headstrap
8' of 5/16" rope
|
|
|
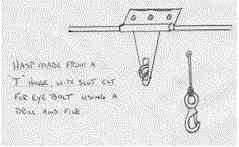
Hasp and clip for the front of grub box
3 -- There are 2 ways to build the curved bottom.
If the curve is very slight, bending the bottom plywood will
suffice. If the curve is at all steep, it's better to accomplish
the curve by laying strips of wood as in a strip-built canoe.
This is not difficult. First, assemble the walls of the box,
by glueing and screwing (use #5 x 5/8 screws) into the corner
pieces. Then lay the outsized bottom-piece on and try hand bending
the curve. If it bends easily then cut it to size (but leave
the ends, where the bottom joins the sides, slightly long),
glue and screw it into corner pieces secured in the center.
Next trim the ends to the right length using a plane. Then wrap
a rope tightly around the box to pull the bottom piece onto
the sides. Wedge scrap wood under the ropes to tighten them.
Again glue and screw to corner pieces secured to the inside
of the front and back piece. Corner pieces will not fit though,
where the bottom meets the sides. To make this joint, stitch
the pieces together using light wire or heavy thread every 2"
or so. Then cut a 3" wide strip of fiberglass cloth and
lay it over the joint, bedded in resin. After it cures, sand
and paint another layer of resin on the first.
If the bend is too great, then cut, glue and screw only the
flat part of the bottom piece. To fill in the 2 gaps, rip 1/4
x 3/4 strips of cedar or spruce and cut them to the required
length. Then, holding a small plane in one hand and the strip
in the other, bevel the edges of each strip to match the one
just laid down. This is easy and fun and takes only a few passes
per strip. As you lay them down, glue their edges together,
and to hold them in place, nail the ends with 3/4" brads.
After the glue is dry, sand them smooth, lay a piece of fiberglass
cloth (the lightest weight you can find) over the strips overlapping
the side and ends, and wet it out with resin. (Use a squeegee,
or flat plastic wafer, to spread the resin. Don't work the ends
too much to fold them over, or the cloth will come apart.) After
it is cured, sand lightly and apply another coat of resin. |
| |
|
Leather
spice rack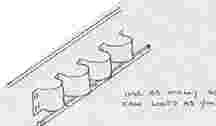 Use as
many spice can loops as you like.
Use as
many spice can loops as you like. |
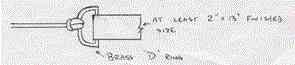 Brass
D Ring for headband Brass
D Ring for headband |
|
|
| |
4 -- Sand and paint. (I paint my boxes spruce green, so
when I stash it in the bush it's camoflaged. The inside I paint with
a white enamel, to aid in cleaning.)
5 -- Install the lid. Make sure the lids rests on top
of all 4 sides. Use bolts, and put some glue on the threads to prevent
the nuts turning off later. I use an eye -- bolt to fit through the
hasp, one that's a convenient size for the snap -- hook. Again, use
an eye -- bolt threaded for a nut, with threads that go right up to
the eye. The snap hook should be brass, and held by strong cord with
a stopper knot on the other end.
6 -- Make the headstrap by stitching a piece of leather
at least 2" x 13" around 2 "D" rings. Use a heavy
thread. Make sure that the "D" rings are formed as one continuous
piece of metal rather than with 2 ends bent together. In the latter
case they'll pull apart under load, so have them welded or braised.
The handles are simple 5/16 ropes fed through holes 3 1/2" from
the top edge (bevelled to reduce chafe), and tied off with figure-of-8
stopper knots inside. This allows you to undo the knots if you ever
want to ship the box by air. The ropes that connect the handles to
the headstrap are adjusted in length so that the box rides as low
as is comfortable on your back. The box is portaged with its lid against
you, and with its front uppermost.
7 -- A spice rack is very convenient and simply made by
storing the spices in film canisters, and using elastic waistband
material to hold them to the box side. The elastic folds are stapled
to the sides with 1/4" staples, and bedded in a drop of resin
as well. Under the canisters, glue a 1/4" x 1/4" scrap of
wood in place to help them stay put.
8 -- A corner of the box can be easily made into a cutlery
compartment by stapling/glueing fabric across the corner. Be sure
to fashion a lid as well, using a bit of velcro to allow it to be
securely closed. A plate holder can be made the same way. (Note: the
glue won't stick to painted wood. You'll have to scrape it off where
you wish the glue to bond.) |
|
|